How to Dehydrate Parsley | Preserve Fresh Herbs for Months
A Taste of Summer, All Year Round
Parsley is one of those humble herbs that’s often underestimated. Yet, when you’ve got a bunch fresh from the garden, it’s worth preserving every last bit. If you’ve picked it up cheap at the market, it’s worth preserving too. Dehydrating parsley is one of the simplest ways to keep its fresh, green flavour alive right through the seasons.
If you’re all about saving money, reducing waste, and building a more self-sufficient kitchen, this post is for you.
Watch on YouTube
Want to see exactly how I do it? Watch me dehydrate parsley over on my YouTube channel:Slow Cooker Caramelized Onions | A huge day in the kitchen
Other Recipes Using Parsley
If you’re keen to use your new dehydrated parsley, try some of these recipes:
- Quick Corn Fritters Recipe | 15-Minute Meals
- Hearty Potato, Bacon & Onion Soup | Comfort Food In A Bowl
- Cheat’s Chicken Pot Pie: Comfort Food Made Easy
Step-by-Step Dehydrating Guide
- Harvest & Wash
Choose fresh, healthy parsley stems — ideally in the morning when oils are most concentrated.
Rinse gently in cool water to remove dirt or insects, then shake off excess moisture and pat dry thoroughly. I like to give mine a good soak in cold water for 30 minutes or so. - Remove Stems
Trim off the thick stems, keeping mostly the leafy parts. Thin stems are fine to include — they’ll dry well too. - Choose Your Method
Using a dehydrator: Set temperature between 35–45°C (95–113°F). Spread leaves evenly on trays and dry for 4–6 hours.
Oven drying: Set your oven to the lowest temperature, prop the door open slightly, and check every 20–30 minutes.
Air drying: Gather parsley into small bunches and hang upside down in a warm, dry, and well-ventilated space. This method takes 1–2 weeks. - Check for Dryness
Parsley is ready when it feels crisp and crumbles easily between your fingers.
Conditioning Your Parsley
Once your parsley is dry, there’s one more important (and often skipped) step — conditioning. It’s a gentle, old-fashioned practice that helps make sure your herbs stay perfectly dry and mold-free once they’re packed away. Think of it as letting your parsley “settle in” before its long shelf rest.
What Conditioning Means
Conditioning is simply the process of evening out any remaining moisture in your dehydrated food. Even if the leaves feel crisp, there may still be tiny pockets of humidity hiding in thicker pieces. By conditioning, you give that moisture time to distribute evenly — preventing spoilage or mold down the track.
How to Condition Dried Parsley
Here’s how I do it in my kitchen:
- Cool completely after dehydrating. Don’t rush this step — herbs need to be cool to the touch before storing.
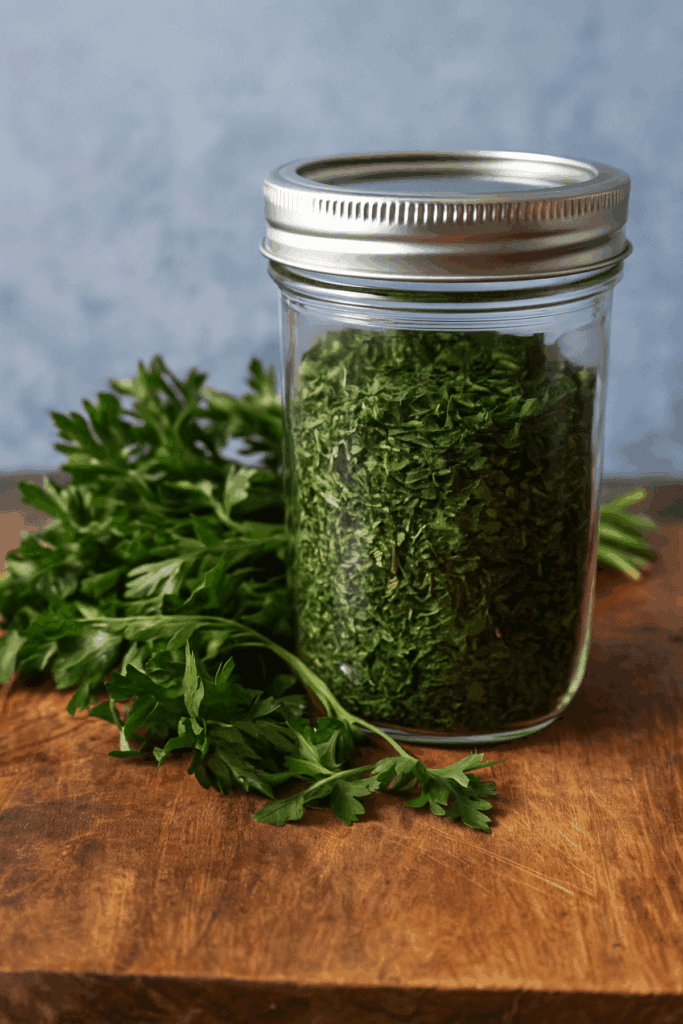
- Transfer to a large glass jar with a loose-fitting lid. Fill it no more than two-thirds full.
- Shake daily for 5–7 days. Give the jar a gentle shake once a day to move the leaves around. This helps any residual moisture disperse evenly.
- Watch for clumping or condensation. If you see foggy spots on the glass or feel dampness, the parsley needs a bit more drying time. Pop it back into the dehydrator or oven for another 30–60 minutes.
When the parsley stays dry and crumbly after a full week, it’s fully conditioned. It is ready to store long-term in airtight jars.
Why Conditioning Matters
There’s something almost meditative about this part of the process. It’s that little daily ritual of checking your jar. You watch the colour stay bright and the texture stay crisp.
It’s one of those slow, mindful homestead habits that saves you heartache later on. Proper conditioning prevents mold. It also keeps your dried parsley flavourful and vibrant for months. Sometimes, it remains vibrant for a full year if stored well.
Storage & Usage Ideas
- Store in a glass jar or airtight tin — label with the date.
- Keep in a cool, dark cupboard.
- Use in soups, casseroles, scrambled eggs, salad dressings, and sauces.
- Substitute 1 tsp dried parsley for 1 tbsp fresh in most recipes.
Stacey’s Kitchen Tips
- Don’t rush the drying time. If it’s even a little damp, moisture can cause mold.
- Mix it up! Try dehydrating parsley alongside chives, mint, or dill to create your own dried herb blends.
- Save money year-round. Growing and drying your own parsley beats paying supermarket prices every single time.
- Buy parsley in bulk when you see a good special at the veggie shop or supermarket.
- Parsley Growing Guide can be found here if you want growing tips.
Variations
If you love this process, try dehydrating other herbs too — basil, thyme, oregano, or even celery leaves. They all dry beautifully and are perfect for adding depth to soups and stews. We will cover this more in the future as my garden gets up and growing. Also, keep checking back to the website as I add growing tips to the cultivate section of my website.
Final Thoughts
Dehydrating parsley is one of those quiet little kitchen skills that makes a big difference. You’ll save money, reduce waste, and always have herbs on hand — even in the middle of winter. It’s also a great first step if you’re learning how to preserve food at home.
So next time you see a bunch of parsley starting to wilt, don’t toss it — dry it! You’ll thank yourself later.
—
With love from the homestead,
Stacey | Farmer’s Wife Homestead